A connect customizing is a software development project, so we should handle it accordingly and use a VCS (Version Control System) for its maintenance.
Prerequisites: you should know how to do file-based connect customizings and how to use a command line tool. Ideally you also have experience with Integrated Development Environments (IDE) and git.
As an ARIS Connect developer I get often asked about the connect configuration and how to document the changes in a customizing. After multiple internal and external discussions with our customizing department and partner companies, a good approach would be to use a versioning system as we usually do for developing the software. The approach that I will show here is the integration with git.
Advantage of using VCS
In VCS you are able to summarize blocks of works and commit them. So all changes that are necessary for one block of work are tied-up in one commit with a description and all changes you do is just a time-based list of commits. If you then need to find a reason for a specific change or need to follow the single steps the customizer did, you can use the history of the commits and you can see every single file change and the reason for this block of changes.
Advantage of using git
There are multiple versioning systems but most of them need a central repository to work properly, but for git this is optional. So if necessary you can work completely local but you also can allow to use a central approach.
By just copying this local folder structure, you then not only get the customized files but also the complete change history and you can easily it forward to other colleagues.
Using git for customization
Th e first step for creating a customizing is to download a connect configuration to your local file system.
Then unzip the file and open the created folder. It should contain a folder named classic (dependent on the configuration you downloaded) and .metadata. After renaming the configuration folder (e.g. classic) to you own customizing name (e.g. custom) you need to create a git repository out of it. (How to install git locally you can see in the reference links at the bottom of the page.) The command line "git init" inside of your unzipped folder does this.
git initInitializes a git repository in the current folder and creates a hidden .git folder for saving the versioning information
The next step is the creation of a .gitignore file that determins what parts of the folder are not considered from the VCS. In the example with the folder name "custom" the .gitignore file would look like this:
.metadata/**
.gitignore
custom.zip
The metadata folder is not included as well as the gitignore file itself and the zip file that can be generated from our custom folder.
After that we need to prepare the new files (in this case the whole configuration folder) to the get committed by executing "git add .". (Btw: The reverse function of add would be git reset)
git add .The add command moves the mentioned files to a staging area, that is for preparation of the commit command afterwards. The "." means all files in the folder should be included.
The commit to a local git repository is then executed with the "git commit" command.
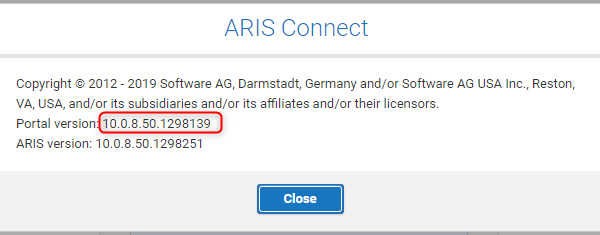
git commit -m "init classic config from version 10.0.8.50.1298139"To allow an easier tracking of the changes it is recommended to use the -m parameter seriously. Therefore I would suggest for the first commit to include the connect portal version. You can retrieve it from the about dialog:
Now that we have setup a repository and committed our initial code, we can work on a block of customizing changes. How large you choose a block to be is mainly in the responsibility of the developer, but I would recommend to make small steps and after a successful change you should commit it with an according message.
So let's assume some changes were done in the configuration file, we have zipped our custom folder and uploaded it again to the portal. Now we have a reasonable block to commit.
This can then be done by "git add" and "git commit" like in the examples before.
Additional hints
During development you sometimes need to see more information about your current status and the already committed parts.
Here are some git commands that may help a little:
git statusShows information about your not yet committed changes.
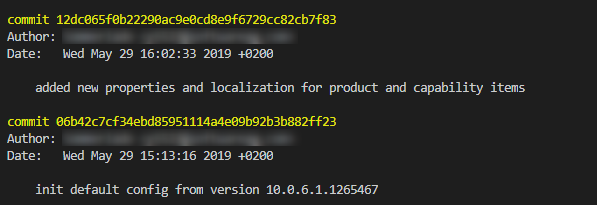
git logShows a list of all commits that were done.
git show "12dc065f0b22290ac9e0cd8e9f6729cc82cb7f83"Shows the changes that were done in a specific commit. The parameter is the identifier you get from the git log command.
If you use an IDE with better git support, the history and the changed files can be shown in a much more convenient way, but as a first step the command line tool is already a good progress regarding maintaining configurations.
Resources:
https://git-scm.com/ git version control system
https://www.linode.com/docs/development/version-control/how-to-install-git-on-linux-mac-and-windows/ How to install git
https://code.visualstudio.com/ Free IDE with great git support
https://github.com/huizhougit/githd easy to use git extension for visual studio code


