
back to: ONE Standard - Foundation Accelerator
Table of Content
- Install ONE Standard - Foundation via ARIS Gallery
- Database renaming and publication
- Content-Type Configuration as a standalone component installed after the Gallery installation.
- Troubleshooting
Install ONE Standard - Foundation via ARIS Gallery
- Open the ARIS Gallery in your project room
- Go to BPA > Getting Started Framework and click the ONE Standard - Foundation
- Press Install

Database renaming & publication
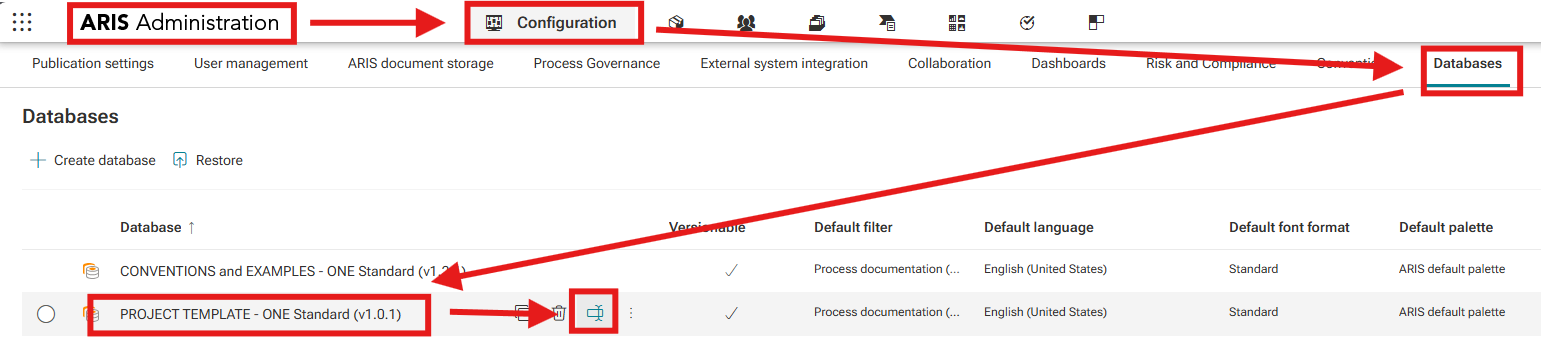
- Go to ARIS Administration and navigate to Databases
- Select the PROJECT TEMPLATE database and rename it according to your project or initiative.
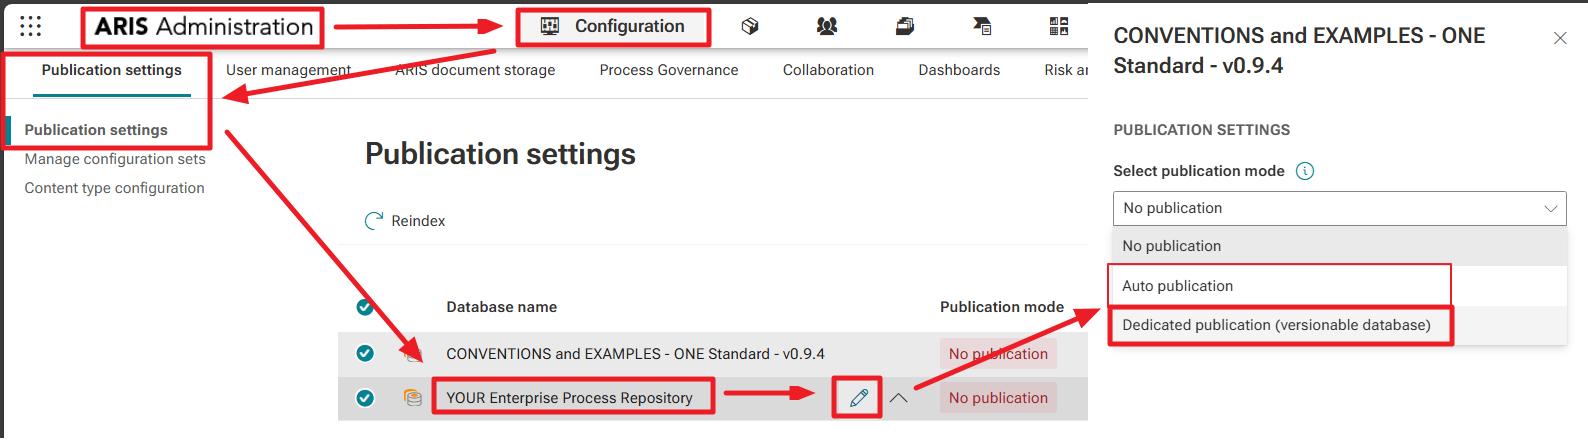
- Afterwards open Publication Settings.
- You will see both databases listed.
- For your Project Template Database (your future process repository), choose the appropriate publication option:
- During the initial setup phase: Auto Publication is sufficient.
- Once moved into production: switch to Dedicated Publication.
Content-Type Configuration installation
Ensure that you import the configuration matching your ARIS edition — the edition is clearly indicated in the file name.
Download the Content Type Configuration Files
- Download the missing Content Type Configuration (from the ARIS Download Center)
- Either: "For ARIS ENTERPRISE - ONE Standard - Foundation - Content Type Configuration (vX.Y.Z)"
- or "For ARIS ENTERPRISE Public Cloud - ONE Standard - Foundation - Content Type Configuration (vX.Y.Z)"
- or "For ARIS ADVANCED - ONE Standard - Foundation - Content Type Configuration (vX.Y.Z)"
- Download it here
- (requires log in on ARIS Community)
Import and activation of Content Type Configuration
For ARIS Enterprise Public Cloud and ARIS Advanced, the procedure is almost identical; minor UI differences may occur, but the overall process remains the same.
The following steps are carried out within the ARIS Administration area!
- Navigate to Configuration → Conventions
- In the left-hand menu, select Content Types.
- Click Import and select "Import from file"
- Select the relevant Content Type Configuration file
- And press "Import"

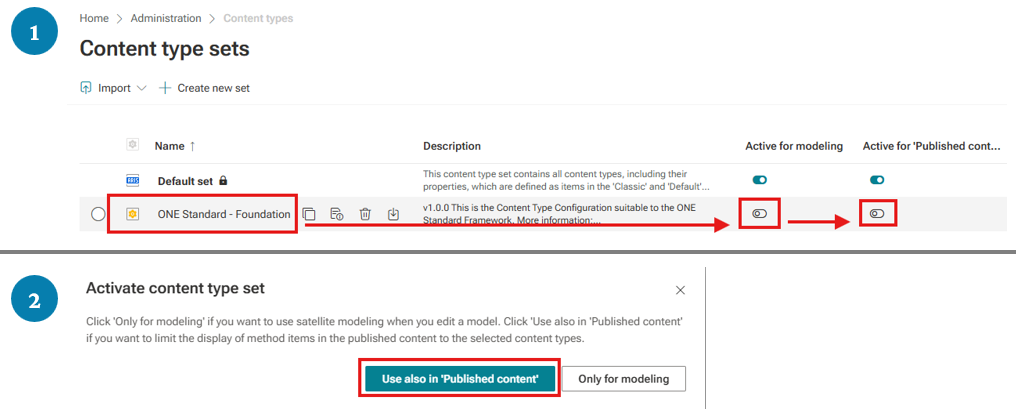
After Content Type Configuration import, you need to:
- "Activate to modeling" the new ONE Standard Content type
- and select "Use also in Published content"
Troubleshooting
-
Accelerator installation failed – filter already exists
During installation, you may encounter an error such as:
“Import of filter ‘Process Documentation (ONE Standard)’ failed: The default convention with the GUID already exists and won't be overwritten.”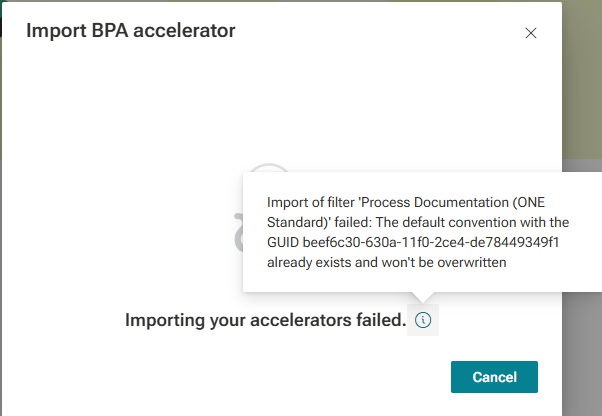
This occurs because a previous version of the filter already exists in the system.
To resolve the issue:
- Open ARIS Administration
- Navigate to Configuration → Conventions → Filters
- Locate “Process Documentation (ONE Standard)”
- (Optionally: Backup or duplicate this filter version)
- Delete the existing filter manually
- Restart the accelerator installation
-
Accelerator installation cannot be started – databases already exist
The installation may be blocked with a message such as:
“At least one database already exists on the system. Rename or delete the relevant databases and import this accelerator again.” Additionally, entries like the following may appear: “The database already exists.”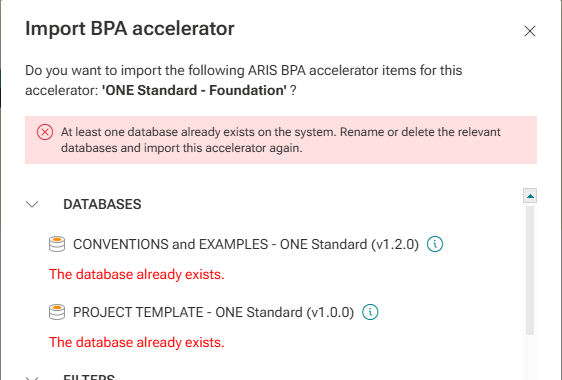
To resolve the issue:
- Open ARIS Administration and navigate to Configuration → Databases
- Locate the existing databases:
- CONVENTIONS and EXAMPLES – ONE Standard
- PROJECT TEMPLATE – ONE Standard
- Either:
- Rename both databases (a small change, e.g. adding a suffix, is sufficient), or
- Backup and delete the databases
- Ensure the original names are no longer in use
- Restart the accelerator installation
Need Help?
If you have questions about any Accelerator or want to exchange experiences with others, visit our community forum. There you can ask questions, share insights, and support each other.