Hello Community,
Now, as we have discussed the string table in the previous tutorial it is time to talk about custom dialogs. You can’t create custom dialogs with a wizard, you have to do it manually. But prior we start with dialogs, let me enhance the code a bit as usual, to increase our testing capabilities.
In this tutorial we will discuss:
A) More Object Options
B) Custom Dialog
C) One more Parameter
Let's begin!
A) More Object Options
As of now, we always need to select objects in an open model to run the report. By writing some more code lines we can add easily some more start options. In fact I like to select an object (or a group of objects) and also a single model, and list all maintained object attributes from them.
Please perform the following steps to cover this functionality:
Step 1. Allow more start options
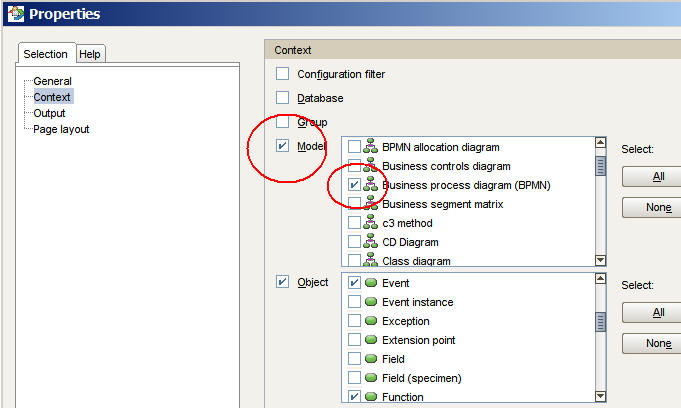
Allow additional context elements to choose in the report properties. Check at least a model type to call the report from (I have checked the model types BPMN and EPC).
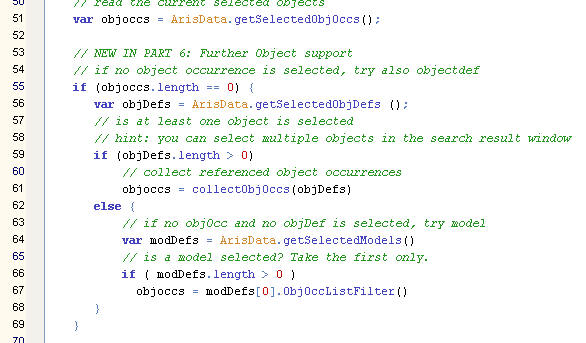
Step 2. Add the following code
You see that in all cases we try to find valid object occurrences (to set the objoccs variable). Only in case this is not successful, we will raise the error message as usual.
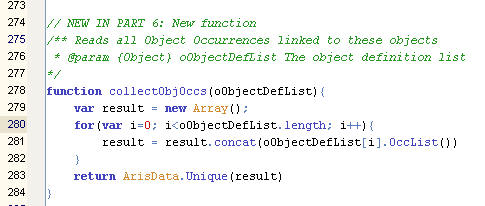
Step 3. Add the needed collector function
This collector will loop through all object occurrences in case we have selected multiple objects.
Hint: You can’t select multiple objects in the navigator, but you can do a multi select in the search result form.
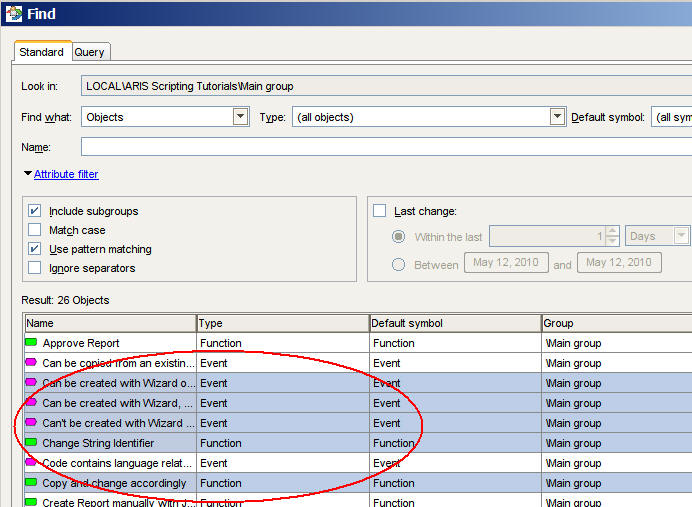
From now on you can select one of the following objects to start your report:
- object occurrences in your model (as before),
- or individual objects in the explorer
- or multiple objects in the search result window
- or a single model from the explorer or designer.
Try it out!
B) Add a Custom Dialog
Let’s continue with the main topic 'Custom Dialog'. To define the dialog we usually use a separate function. Such a function has to fulfil the following main steps:
1. Create a dialog template
2. Add the objects you like to see in the dialog; like text, checkboxes, selection lists, buttons
3. Define a dialog object based on the template
4. Read and set default options for the checkboxes and selection lists
5. Open the dialog
6. Ask for the button used to close the dialog (can be [Ok] or [Cancel])
7. If the answer is [Ok]:
a. Assign the selected values to global variables
b. Save the selected values for reuse
c. Perform the report generation by using the global variables
8. If the answer is [Cancel], stop the report
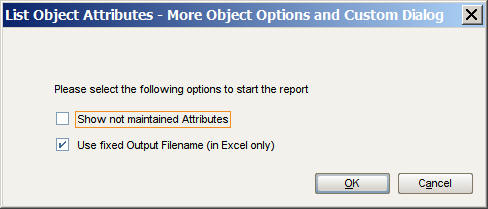
I will now explain each step a little bit more by referencing the code. In the first run we will have two checkboxes in the dialog, one to display the not-maintained attributes and another to force the common file name as output (works by now in Excel only).
Step 1. Create a dialog template
This step is just a line, you can define the dialog size, but there is a minimum size that will be kept automatically, and you can not go under. The sScriptName is a new global variable to hold the script name, here used also as dialog title.

Step 2. Add the objects you like to see in the dialog like text, checkboxes, selection lists, buttons
We are going and add a general text, two check boxes and the OK and Cancel button. For check boxes there are, apart from the position and length, two more attributes. The first is the text you like to display behind, the second is the internal Id we define for this check box. We need this later for steps 4 and 7.

Step 3. Define a dialog object based on the template
This is again one line only. We define the variable dlg to hold the dialog object.

Step 4. Set default options for the checkboxes and selection lists
This is a nice feature to use for dialogs, as we can reload previous selected values to provide the same selection when the user goes in again. We use the ReadSettingsDlgValue function to do that, option by option. The long sSession variable acts as container for all these values. The long number in it is the report identifier itself; you can get it from the report properties (it has to start with a character, therefore the additional DLG_VALUES_).

Step 5. Open the Dialog
Again just one line.

Step 6. Ask for the button used to close the dialog (can be [Ok] or [Cancel])
As we assign the returning value to the nuserdlg variable, we can use it for the next check immediately.

Step 7. If the answer is [Ok]
We will assign the returning values to our global variables and also save the values into our session area.

Step 8. Handle [Cancel]
We will return true or false to the calling statement to allow a cancel in case someone hit the cancel button.

Step 9: How to call now the dialog?
This step is simple, we just call it in front of the already existing main() function call right on the end of our script.

Step 10: Maintain the String Table
What is missing? Well, if you take my code, you need to maintain the string table accordingly. In my case, you need to add the following text elements (the 4th row is already for part C):

Hint: The reason to use DLG_ as a prefix is just to separate text elements used in the dialog from other text in the report.
You should now be able to test this dialog already. It should work and allow you to run your report with different output options.
C) One more Parameter
Let us add now another parameter. It is a little bit tricky, therefore separated.
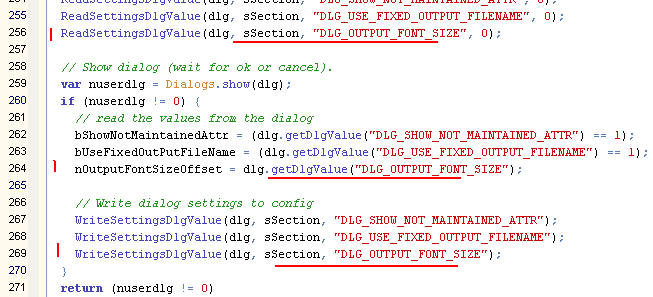
We would like to have a selection box to define the font size in our output. Ok, let’s begin with the values you expect to see. We define an array to hold the values, and another variable to hold the return value:

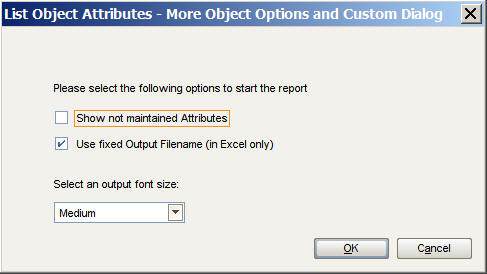
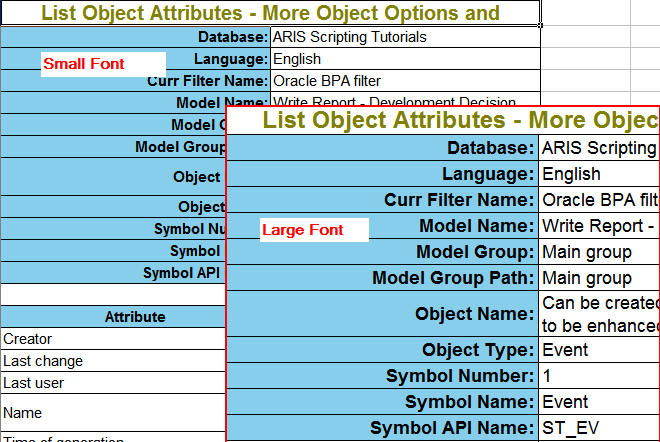
The interesting thing with selection lists is the returning value as number, whereas the first selection element returns 0, the next 1, the next 2 … This means our value ‘Small’ is internal a 0, ‘Medium’ corresponds to 1 and ‘Large’ is 2. To increase the font size, we will just add this offset to the values we have already in our Styles function. Isn’t that easy?

What additional code we need to add? Well, we have to define the box itself and another comment around would be nice. Also one more line for step 4 and also 2 more in step 7. I propose to use the string table again.
.jpg)
Your dialog box should appear like this.
And in case you select small or large as font size the output should react like expected:
Summary
With this tutorial you should have learned how to extend the existing report and allow more alternatives when starting the report. In addition you will now able to define your own custom dialogs and handle check boxes and selection lists (combo boxes). Feel free to enhance the code to fulfil your own needs.
Additional Notes
There are some more minor changes in the code, mainly code cleaning and adding the right comments. You can identify these additions easily by looking for a new comment titled “NEW IN PART 6”
Another method exists to build dialogs, the more java class oriented technique. Although there are also some good examples how to work with, the described way in this tutorial here is perhaps more common. Just let me know if I should also address the other technique in a future tutorial.
Download
Please download the final report file from here
Next Article
In the next article we will handle the missing header and footer and will talk about shared code management.
Related Articles
- Aris Scripting Tutorial - Part 5 - Object Attributes - All Output Formats and Multilanguage
- Aris Scripting Tutorials - Overview
Any kind of feedback is very welcome!
Best regards
Volker


