Manual Installation for the ONE Standard - Foundation Accelerator
The ONE Standard Accelerator can be manually installed in ARIS by importing the provided package files and completing the initial setup. Follow the steps below to install and activate the Accelerator manually.
Video - Manual Installation - ONE Standard Foundation
Download the Installer Files
- Go to the ARIS Community Download Center.
- Log in to access the download section for the ONE Standard Accelerator.
- Download the ONE Standard – Foundation – INSTALL SET – 1.SRx.zip file
Access the Administration Area
- In your ARIS tenant, open the Administration section.
- Under Configuration, navigate to Conventions.
- In the left-hand menu, select Filters.

Import the Method Filter
- Use the Import function to import the corresponding ONE Standard - Method filter - vX.Y.Z.filter file.
- Alternatively, drag and drop the filter file directly into the import window.
- The import process takes a few seconds; the status “Importing filter” appears at the bottom of the screen.
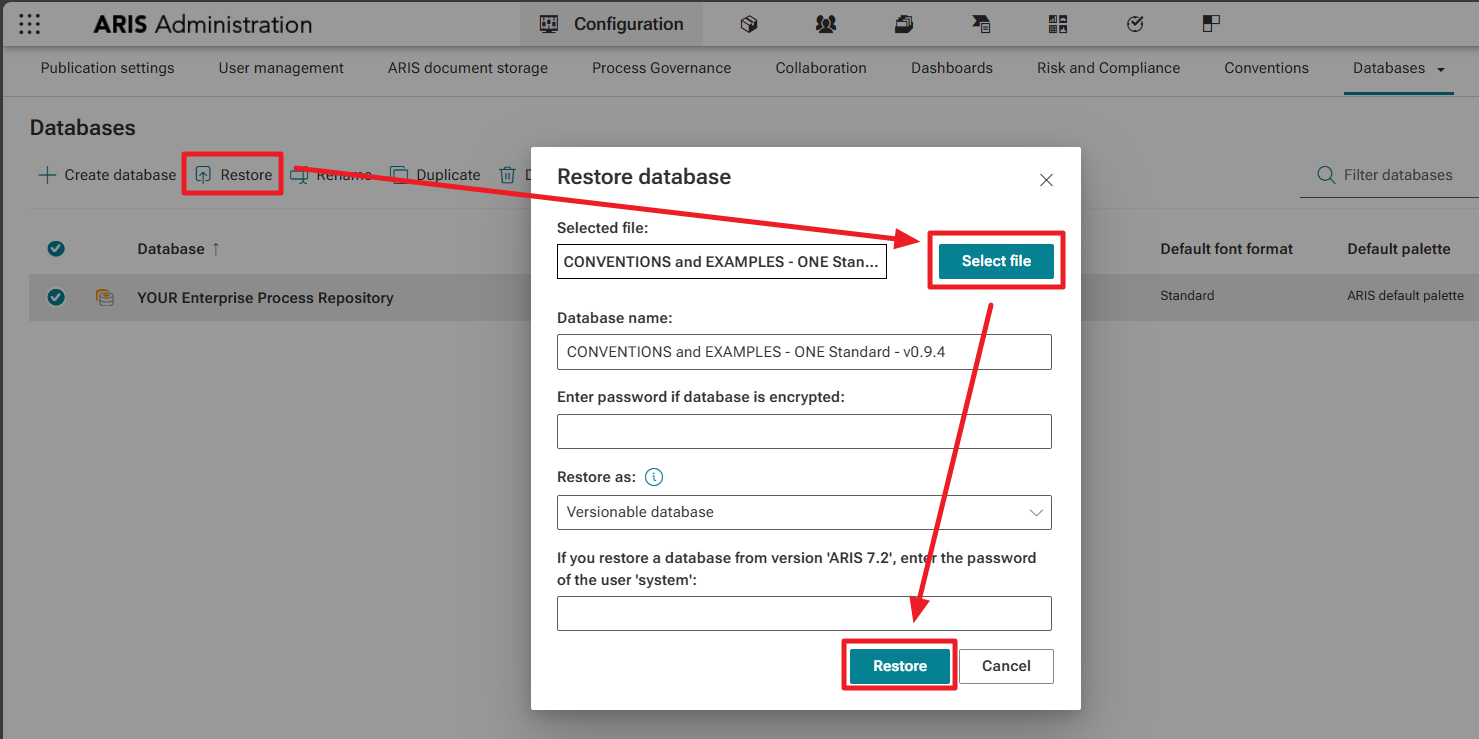
Restore the Project Template Database
- Switch to the Databases area in Administration.
- Choose Restore database, then select the Project Template Database file from your unzipped installation folder.
- You may rename the database immediately or later (for example, based on your project or initiative name).
- Ensure that the database is set as a Versionable Database (this setting is typically preselected).
-
The restoration process completes within a few seconds.

Restore the Conventions and Examples Database
- Next, restore the second database included with the package: the Conventions and Examples Database.
- You can keep its default name.
- This database is intended as a reference, not for general project work, and provides modeling conventions and examples for modelers and the Center of Excellence.
- Setting it as versionable is optional.
Verify Database Settings
- After restoring both datbases, check properties respectively:
- assigned Default filter = Process Documentation (ONE Standard)
- Default language = English (United States) - The first version of ONE Standard is prepared only for this language!
- check Versionable settings

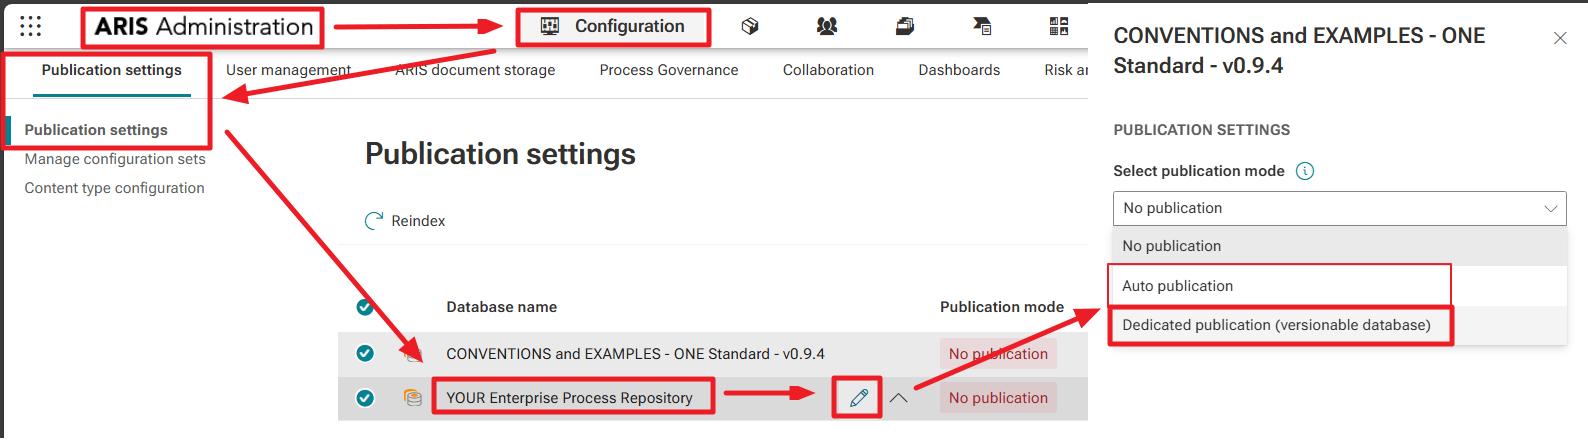
Adjust Publication Settings
- Afterwards open Publication Settings.
- You will see both databases listed.
- For your Project Template Database (your future process repository), choose the appropriate publication option:
- During the initial setup phase: Auto Publication is sufficient.
- Once moved into production: switch to Dedicated Publication.
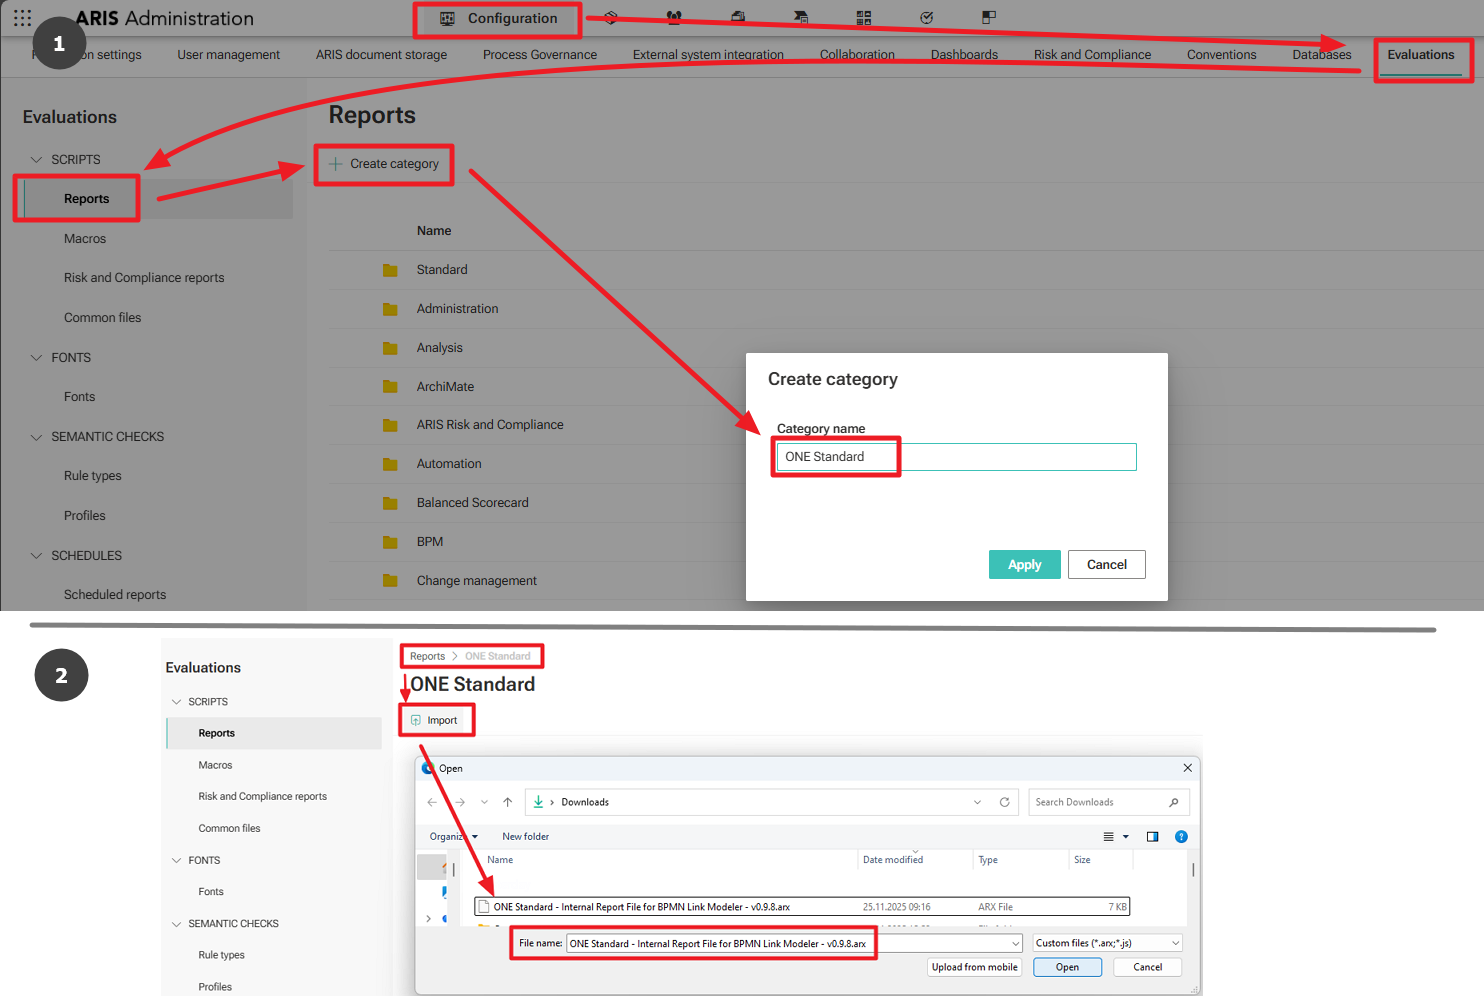
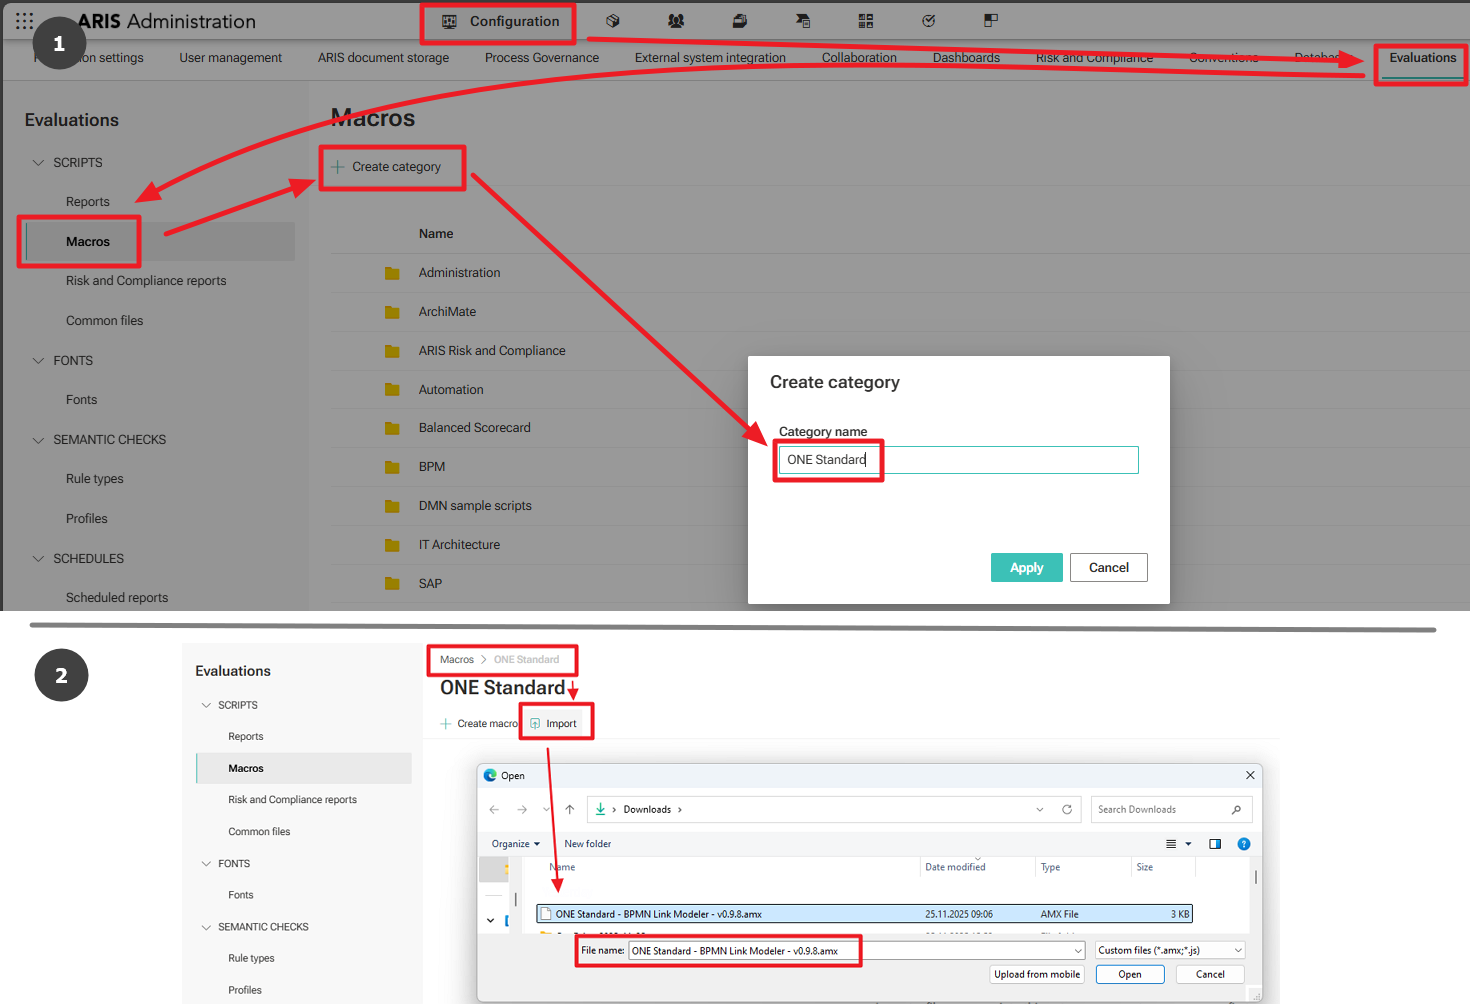
Import BPMN Link Modeler
The BPMN Link Modeler consists of two separate components that must be imported — and thereby installed — individually:
- 1x Report (.arx)
- 1x Macro (.amx)
1. Import Report component
- Navigate to Configuration → Evaluations → Reports. Create a new category using Create Category (for example, named ONE STANDARD).
- Open the newly created category.
- Use the Import function and select the .arx file that was extracted from the ZIP package.
2. Import Macro component
- Switch to the Macros section next to Reports.
- Create a new macro category using New Category.
- Enter the category and select Import.
- Choose the .amx file from the previously unzipped package.
(Execution by ARIS Modeler: The functionality is triggered directly by the modeler via double-click. This action starts the macro, which in turn uses the report in the background to perform its tasks.)
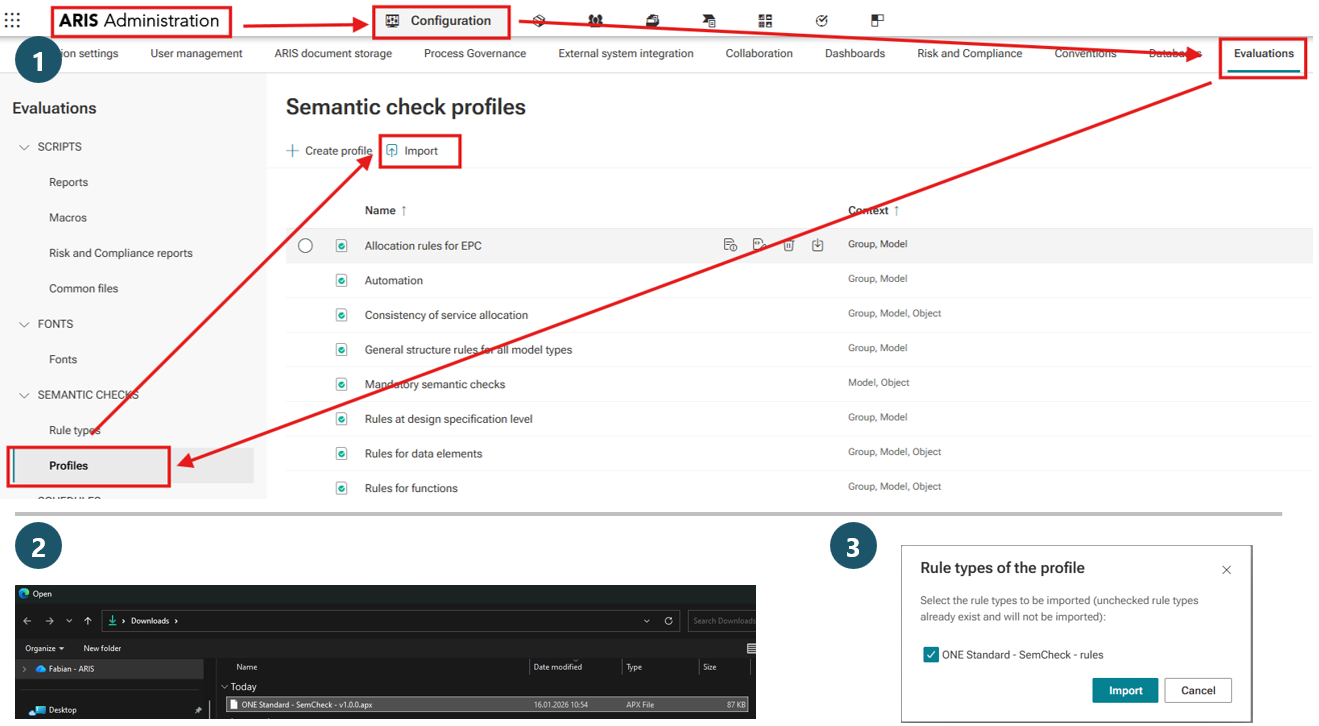
Import Semantic Check
- Navigate to Configuration → Evaluations
- Open Profiles under Semantic Checks
- Click Import
- Select the "ONE Standard - SemCheck - vX.Y.Z.apx" file
- Check ONE Standard – SemCheck rules in the subsequent dialog
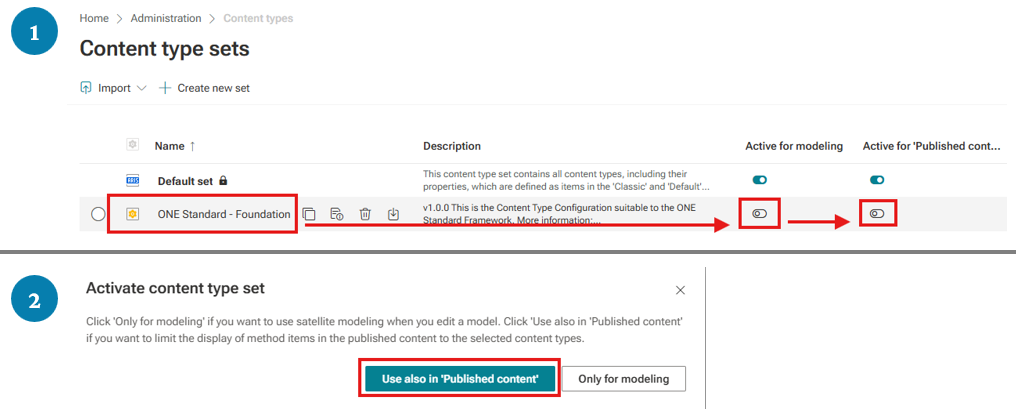
Import and activation of Content Type Configuration
Ensure that you import the configuration matching your ARIS edition — the edition is clearly indicated in the file name.
For ARIS Enterprise Public Cloud and ARIS Advanced, the procedure is almost identical; minor UI differences may occur, but the overall process remains the same.
- Navigate to Configuration → Conventions
- In the left-hand menu, select Content Types.
- Click Import and select "Import from file"
- upload the .cce file that suits to your ARIS edition
- And press "Import"

After Content Type Configuration import, you need to:
- "Activate to modeling" the new ONE Standard Content type
- and select "Use also in Published content"
Completion
- The installation is now complete.
- You have successfully imported the Method Filter, restored the Project Template Database, imported the Conventions and Examples Database, and imported the BPMN Link Modeler as well as the Semantic Check, and finally you imported the suitable Content Type Configuration.
- Your ARIS environment is ready to start building the organization’s process repository based on the ONE Standard.
Need Help?
If you have questions about any Accelerator or want to exchange experiences with others, visit our community forum. There you can ask questions, share insights, and support each other.